Integrating the checkout
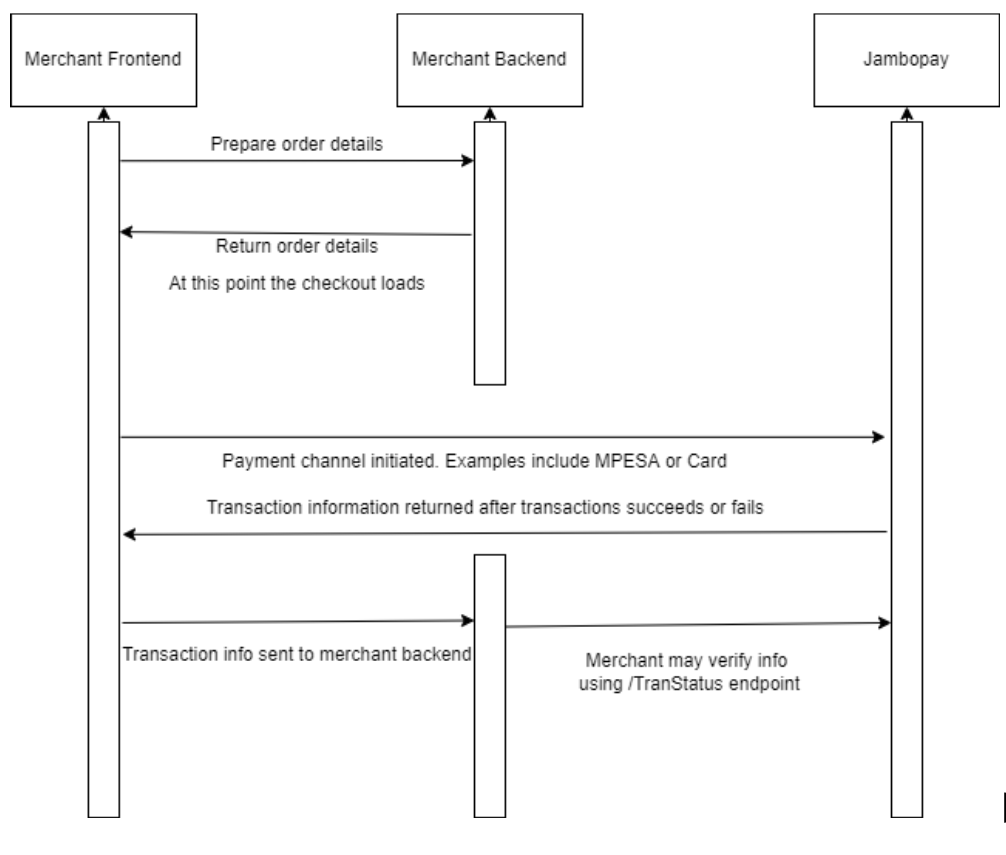
The image below shows the checkout flow. Communication between your backend and Jambopay must be authenticated using a bearer token. The token can be obtained from {{base_url}}/Token for live environments and
{{base_url}}/Token for sandbox environments.
Live environment base url - https://api.checkoutv3.jambopay.com/
Test environment base url - https://checkout-test.jambopay.co.ke
The endpoint receives form-url-encoded data and expects three parameters namely;
- Username- Your username
- Grant_type whose value is password
- Password-Your password
For testing purposes, You will be provided with the above parameters by our support team.
STEP 1:
Include script files in order to have complete checkout functionality.
<script type="text/javascript"src="https://checkout-v3-test.jambopay.co.ke/sdk/checkout-staging-sdk.js">
</script>
An example file with complete integration is provided for download in the link below
https://drive.google.com/file/d/1-veSq0SkGPhpkn2eCj5-8RrQwMBWv7FI/view?usp=sharing
You can obtain your client and checksum keys from your merchant account portal. A sandbox account and link to the portal will be provided by our support team.
HOW TO PREPARE TRANSACTION DETAILS
STEP 2:
1. In your checkout file, ensure you include the following in a single object called checkoutDetails. Most of the values to include can be obtained from your backend and injected into the object.
- OrderId - this the unique ID given to the transaction at the time it was processed.
- CustomerEmail - this is the customer email address.
- Currency - this is the currency to be used in the transaction. In case it is not provided, It shall be set to KES by default.
- CustomerPhone - this is the customer’s phone number.
- OrderAmount - this is the amount to be paid.
- BusinessEmail - this is the merchant email registered with JamboPay. If you provide the wrong email address then the checkout will not be able to work.
- ClientKey- This is the client key provided to the merchant. You can obtain it in the settings section of your merchant account portal.
- CancelledUrl - this is the URL the site redirects to in case the transaction has failed or is cancelled.
- CallBackUrl - this is the URL the site redirects to in case a transaction is successful.
- Description - this is the description of the transaction.
- StoreName - this is the name of the store or the business. In case it is not provided, it shall be called Store by default.
You can include the following custom fields which are optional
a. SupportEmail - this is the email address that belongs to your support team.
b. SupportPhone - this is the phone number that belongs to your support team.
c. UseJPLogo - this is an option to use the JamboPay logo when the checkout pops-up. If yes, the value should always be set to True and if no, the value should always be set to False.
The following code snippet is a sample of how the checkoutDetails object should appear like this
const checkoutDetails = {
            OrderId: "your order ID",
            CustomerEmail: "customer email address",
            Currency: 'KES',
            CustomerPhone: "customer phone number",
            OrderAmount: "the order amount",
            BusinessEmail: "merchant's email address registered on JamboPay",
            CancelledUrl: "URL incase a transaction is canceled",
            CallBackUrl: "URL incase a transaction succeeds",
            Description: "transaction description",
            ClientKey: "Your client key",
            //custom fields
            SupportEmail: "support email address",
            SupportPhone: "support phone number",
            UseJPLogo: yes or no,
            StoreName:"enter your store name"
        }
STEP 3 :
Finally, call the function jambopayCheckout and ensure you have passed the checkoutDetails as shown below. Please note that when using this option, the transaction information is posted to your callback url in a manner that results in a page refresh.
jambopayCheckout(checkoutDetails)
OR
Define a callback function that will be called on success or failure of the transaction. Pass the name of the function as an argument to jambopayCheckout function as shown below. This scenario is suitable for people working in javascript heavy environments where page refresh is not suitable. Transaction information is passed to your callback function from which you can process as needed.
function callback_func(data){
   //process the data here or send it to your backend
}


jambopayCheckout(checkoutDetails,callback_func)
STEP 4:
A popup will appear and load the checkout interface in preparation for the payment.
Once the transaction completes,fails or gets canceled the transaction information will be sent to your callback url through a form post or passed to your callback function if you provide one.